We’re picking back up on our series about choosing your quilting design. Today we’re going to walk through an in-progess project to see how the design process evolves.

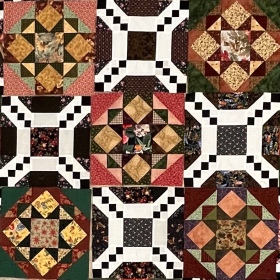
I just basted this vintage quilt made with hand sewn blocks. How should it be quilted? Let’s review what we’ve learned so far in our past posts, and apply it to our current project.
Here are the questions that we’ve already discussed that guide you down the quilting design path:
1. What is the theme/style/feel/genre of your project?
2. What is the destination of your project?
3. How dense do you want your quilting to be?
4. Do you want to use your piecing as a guide?
Each of these steps will narrow down the almost limitless possibilities. Let’s get started!
As for the theme/genre of this project- it is vintage, using a traditional pattern with feminine fabrics. So we’re going to be headed towards flowy, curly, girly-swirly motifs mixed with old-fashioned hand quilting patterns.
The destination is for use as bedding- it’s queen sized. So we’re not quilting this for a competition- so that takes the pressure off. But we want it to look nice on our bed- when the entire project will be viewed as a whole. We will repeat the same motifs in each block and keep the sashing quilting consistent so that it comes together as a whole.

The quilting needs to be dense. The pieces are hand sewn and some are pretty puffy! There are several tucks that need to be worked out. And this will be used and laundered- so there needs to be quite a bit of quilting. The white fabric is very thin and the threads of the adjoining fabrics show through- so it’s best not to quilt on the white fabric. Just leave it unquilted so that it looks a bit puffed out compared to the fabric around it. That will also make the white star stand out better.
How about using the piecing as a guide? I almost always answer yes to this question. It’s just my favorite way to go! And in this case- I think these large geometric blocks will be enhanced by drawing attention to their shapes and contrast. The sashing is a background player in this quilt- so its quilting needs to blend into background too. This is a large quilt- so using too big of motifs will be difficult to keep consistent across the entire top. Plus- it will be heavy in the middle sections and easier to focus on a smaller area.

Now it’s time to get specific! What exactly are we going to quilt? Some use a clear panel to lay on the quilt and draw on to try out different ideas. I usually trace the blocks onto a piece of paper and just start doodling to see what I come up with. Alternatively, I just start drawing on the quilt top with my blue marker and see what happens!
That’s exactly what I did with this quilt. I started by deciding what parts of the block I wanted to draw attention to- how I wanted the eye to be directed around the quilt. We have already decided that we will leave the white stars unquilted and emphasized. The pink diamonds should be the next most prominent parts of the block. I want my quilting to elongate the star so it should be oriented along the long axis of the diamond. The dark triangles should recede to create a bit of dimensionality- therefore heavy, tight quilting on those. The center square should have a stand-alone motif that appears framed by the square. The large blue outside triangles are more background so a filler would be good there.

I started by dividing the large shapes into more manageable sizes. Basically doodling with my blue pen. I created a diamond in the center square and drew a feathered flower, and ferns for the corner triangles. I made a gentle arc along the long axis of the pink diamonds and filled it in a back and forth curly-q. Then I added curved crosshatching to fill the diamond. Any other larger motif was just too large to remain consistent. The block looks small in the photo- but the diamonds are 6” across. Crosshatching is a nod to hand quilting and it doesn’t have to be marked (always a plus!). I chose crosshatching for the sashing pieces as well because the fabric has a perfect diagonal pattern that can be followed to keep it all straight! The corner triangles look cute and feminine with curved orange peel filler.

I used the same center square motif on the sashing corner stones. Doesn’t that sashing crosshatching just take you back?? It’s just the right feel without having to get out the hand quilting hoop!

A word on thread: I used white thread for the bobbin and matched the top thread to the top fabrics. I leave the tension a little loose so that no white dots appear on my top fabric from the bobbin thread being pulled up. This makes little dots of the top thread appear on the backing instead- which I think just adds to the charm because it creates a colorful drawing of your quilting pattern on the back!
How do you plan the quilting for your projects? Please let me know! Happy quilting, everyone! 😁